在Skype 中將IP Cam 作為 WebCam 使用

測試環境

Win10 1803
Skype 8.34.0.78

安裝工具

IP Camera Adapter 3.1
https://ip-webcam.appspot.com/

設定

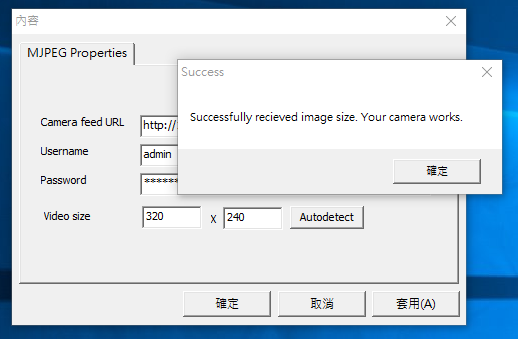
1.於 Configure IP Camera Adapter 設定 Camaera feed url,按下 Autodetect,設定成功後會提示 Success 訊息。

Camera feed url 為取得 JPEG, PNG 或 BMP frames 之 url

Configure IP Camera Adapter
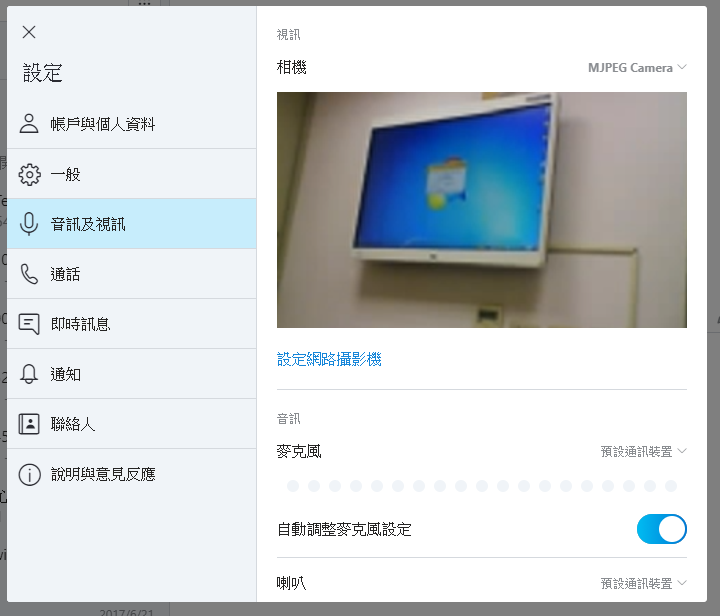
2.在Skype 設定->音訊及視訊->裝置選擇 MJPEG Camera

skype-webcam-config


WordPress 常用插件整理

插件

html after URL

WP Hide & Security Enhancer

UpdraftPlus WordPress Backup Plugin

Polylang

Polylang Slug

Max Mega Menu

Include Me

Insert HTML Snippet

Custom CSS and Javascript

Insert Headers and Footers


EasyChair 投審稿系統研究筆記

工作上需求,要 survey 投審稿系統,這邊簡單整理所收集到的資訊。


Role

Chair 大會主席

  • 檢視所有投稿內容
  • 可直接審稿
  • 處理審稿分配的任務
  • 決定投稿是否錄取

Program Committee (PC) 大會委員

  • 檢視所有投稿內容
  • 受理被分配的審稿

Subreviewer

  • 受理 review request 後,個別進行審稿

Author 投稿人

  • 投稿的人

設定

Paper bidding

Is paper bidding enabled?

  • no (預設)
  • yes (啟用 paper bidding 功能, chair 和 PC 都可以勾選有意願 review 的 paper, chair 可搭配 Interactive Paper Assignment  功能, 去 assign paper)

Is viewing bids of PC members by chairs enabled?

  • no (預設)
  • yes (讓 Chair 可以看到勾選情況)

Is assignment of submitted papers to the program committee enabled?

  • no (預設)
  • yes (重要, 開放 Chair paper assignment 功能)

Review

Permit PC members to enter reviews:

  • no (預設)
  • yes (允許 PC review paper)

Access to reviews by ordinary PC members:

  • all reviews (預設, 每個 PC 都能 review 每篇 paper)
  • only reviews on papers assigned to them (PC 能看見,同一篇 assign paper 的其他 PC 的 reviews)
  • only their own reviews (PC 僅能看見自己被 assign 的 review )

Chair 可以設定 PC 是否能進行 review, 或看不看的到其他人 reviews 的權力


操作

Paper assignment

手動

  • 以 PC member assign
  • 以 paper assign
  • Interactive Paper Assignment
    • 系統 show 出 paper 對 PC 的表格, 滑鼠點擊完成審稿分配的動作

自動

  • Automatic  assignment
    • 依照下列參數設定, 自動安排每位 PC 要審稿的篇數

參數

  • Individual Assignment Bounds for PC Members
    • 設定 PC 可以被分配到的篇數
    • 對應  Automatic assignment
  • Exclude submissions
    • 設定哪篇 paper 不要被分配
    • 對應
      • Automatic assignment
      • Interactive Paper Assignment

運用

Review

  • 給所有 PC / Chair 自由審稿
  • 開放給所有 PC / chair 勾選要 review 的 paper
    由 Chair 手動決定分配結果
  • Chair 手動分配
  • 依照參數系統自動分配
  • 使用 Subreviewer
    他只能看到被分配的 paper  (PC 可以看見每篇 paper 的內容)

Decision

  • Chair 手動指定哪篇 paper 是否錄取


Skype 多方通話筆記

工作上需求,要 survey 多方通話的工具,這篇將以企業運用 Skype 多方通話的情境,整理所收集到的資訊。

使用 Skype 多方通話

  • 撥話方 A 可同時撥打市話/國際電話至不同受話方(聯絡人)  B 和 C
  • 撥話方 A 和 B 用一般 Skype 通話, 再和受話方 C 用市話撥打
  • Skype撥打到手機、市話和國際電話,需事先建立好聯絡人(含號碼)
  • 人數最多 25人

話務費

撥話方 A 需在帳戶內儲值,可從便利商店購買點數卡或是信用卡刷卡儲值。

企業帳戶

考量到是以公務身分打電話,需要企業帳號認證,得提供下列資訊(影本 或 電子檔案* 皆可),以進行申請
  1. 公司變更登記表影本加蓋大小章 (範例圖)
    替代文件:
    扣繳單位的設立登記書
    統一編號編配通知書
    單位證明書影本
    法人登記證影本
  2. 公司負責人之身分證正反面影本
  3. 公司員工所使用之Skype帳號列表

其他連結


從 Ubuntu 建置 Web Reverse Proxy

紀錄在工作環境上,建立 Web Reverse Proxy 的過程。

首先會準備兩台 Apache 主機,一台用來做 Reverse Proxy,另一台為 Web Content Provider。Reverse Proxy 負責對外提供 https 服務, Reverse Proxy 和 Web Content Provider 之間以 https 方式傳輸。

以下範例是 Ubuntu 14.04 Apache Reverse Proxy 的設定:

  • proxy.yourdomain.comweb.yourdomain.com 反向代理
  • 自動從 http 跳轉至 https
  • proxy.yourdomain.com 使用公開信賴的 SSL 憑證
  • proxy.yourdomain.com 之間的連線 web.yourdomain.com 採用自簽憑證(這一段不驗證)

Reverse Proxy

啟用所需相關 module

$ sudo a2enmod ssl
$ sudo a2enmod proxy_http
$ sudo a2enmod rewrite

編輯 apache site conf


<VirtualHost *:80>
ServerName proxy.yourdomain.com
ServerAdmin webmaster@localhost

ErrorLog ${APACHE_LOG_DIR}/error.log
CustomLog ${APACHE_LOG_DIR}/access.log combined 

# http redirect to https
RewriteEngine On
RewriteRule ^(.*)$ https://%{HTTP_HOST}$1 [R=301,L]
</VirtualHost>

<IfModule mod_ssl.c>
<VirtualHost _default_:443>
ServerName proxy.yourdomain.com
ServerAdmin webmaster@localhost 

ErrorLog ${APACHE_LOG_DIR}/error.log
CustomLog ${APACHE_LOG_DIR}/access.log combined

# upgrade-insecure-requests
Header always set Content-Security-Policy: upgrade-insecure-requests

# SSL cert
SSLEngine on
SSLCertificateFile /etc/apache2/ssl/server.cer
SSLCertificateKeyFile /etc/apache2/ssl/server.key
SSLCertificateChainFile /etc/apache2/ssl/uca.cer

# SSLProxy: don't verify certificate
SSLProxyEngine On
SSLProxyVerify none
SSLProxyCheckPeerCN off
SSLProxyCheckPeerName off

# reverse proxy path
ProxyPreserveHost On
ProxyPass "/" "https://web.yourdomain.com/"
ProxyPassReverse "/" "https://web.yourdomain.com/"

BrowserMatch "MSIE [2-6]" \
nokeepalive ssl-unclean-shutdown \
downgrade-1.0 force-response-1.0
# MSIE 7 and newer should be able to use keepalive
BrowserMatch "MSIE [17-9]" ssl-unclean-shutdown
</VirtualHost>
</IfModule>

重啟 Apache 服務

$ sudo service apache2 restart

Web Content Provider

啟用所需相關 module

$ sudo a2enmod ssl

編輯 apache site conf

<IfModule mod_ssl.c>
 <VirtualHost _default_:443>
 ServerName web.yourdomain.com
 ServerAdmin webmaster@localhost
 DocumentRoot /var/www/html

 ErrorLog ${APACHE_LOG_DIR}/error.log
 CustomLog ${APACHE_LOG_DIR}/access.log combined

 SSLEngine on
 SSLCertificateFile /etc/apache2/ssl/apache.crt
 SSLCertificateKeyFile /etc/apache2/ssl/apache.key

 BrowserMatch "MSIE [2-6]" \
 nokeepalive ssl-unclean-shutdown \
 downgrade-1.0 force-response-1.0
 # MSIE 7 and newer should be able to use keepalive
 BrowserMatch "MSIE [17-9]" ssl-unclean-shutdown

 </VirtualHost>
</IfModule>

重啟 Apache 服務

$ sudo service apache2 restart

補充

Firewall policy 的部分,可以設定為

  • proxy.yourdomain.com 對外開放  80, 443 port
  • web.yourdomain.com 的 443 port 只對 proxy.yourdomain.com 開放

參考

Let’s encrypt on Apache

使用 https 加密連線,讓你的 Apache 網站更安全

以下是 Ubuntu 14.04 Apache 的部屬範例。

安裝部屬工具

$ sudo apt-get install software-properties-common
$ sudo add-apt-repository ppa:certbot/certbot
$ sudo apt-get update
$ sudo apt-get install python-certbot-apache

產生憑證

手動產生 www.yourdomain.com 憑證

$ sudo certbot --apache certonly --cert-name www.yourdomain.com -d www.yourdomain.com

產生的憑證會在 /etc/letsencrypt/live/$domain 目錄下

Certbot – Where are my certificates?

套用憑證

編輯你的 apache site conf


<IfModule mod_ssl.c>
 <VirtualHost _default_:443>
 ServerName www.yourdomain.com
 ServerAdmin admin@yourdomain.com
 DocumentRoot /var/www/html

ErrorLog ${APACHE_LOG_DIR}/error.log
 CustomLog ${APACHE_LOG_DIR}/access.log combined

Include /etc/letsencrypt/options-ssl-apache.conf
 SSLCertificateFile /etc/letsencrypt/live/www.yourdomain.com/cert.pem
 SSLCertificateKeyFile /etc/letsencrypt/live/www.yourdomain.com/privkey.pem
 SSLCertificateChainFile /etc/letsencrypt/live/www.yourdomain.com/chain.pem

</VirtualHost>
</IfModule>

重新載入 site conf 以生效

$ sudo service apache2 reload

如果沒開 mod_ssl 記得要打開

$ sudo a2enmod ssl

更新憑證(尚待驗證)

Certbot 有提到,憑證到期前會自動更新,這部分應該不需操心。

The Certbot packages on your system come with a cron job that will renew your certificates automatically before they expire.

查看憑證的效期

$ sudo certbot certificates

撤銷憑證

撤銷 www.yourdomain.com 的憑證

$ sudo certbot revoke --cert-path /etc/letsencrypt/archive/www.yourdomain.com/cert1.pem

可以透過檢查憑證目前的效期,來確認是否撤銷

$ sudo certbot certificates

已經撤銷的話會顯示如下

-------------------------------------------------------------------------------
Found the following certs:
  Certificate Name: www.yourdomain.com
    Domains: www.yourdomain.com
    Expiry Date: 2017-08-03 06:07:00+00:00 (INVALID: REVOKED)
    Certificate Path: /etc/letsencrypt/live/www.yourdomain.com/fullchain.pem
    Private Key Path: /etc/letsencrypt/live/www.yourdomain.com/privkey.pem
-------------------------------------------------------------------------------


Windows 7 的 Update 卡住

近期 WannaCry 勒索病毒猖獗,首要任務是確保 Windows Update 狀況。工作上確認Windows Update 狀況時,發現有的 Windows 7 電腦從 2016/10 後沒有再更新了。

不論是透過系統內建的 Windows Update 功能,或是離線安裝 2017/5 整合安全性更新包,均會卡住。網路上有許多類似的情形,這邊紀錄處理的步驟。

  • 從服務關閉 Windows Update
    • 電腦管理>服務與應用程式>服務>Windows Update
  • 清除 C:\Windows\SoftwareDistribution\DataStore\ 目錄下所有內容
  • 安裝 KB3050265KB3102810KB3161664
    • 從 microsoft.com 下載安裝檔
  • 安裝 KB4019264 (2017/5 整合安全性更新包)
    • 從 microsoft.com 下載安裝檔


安裝完 KB4019264 後,會要求將電腦重新啟動,重新啟動後,再到控制台的 Windows Update,運行 “檢查更新",確認 Windows Update 能順利運作。

Apache 常用設定

情境

網站根目錄禁止目錄索引 & 允許 .htaccess 複寫

  • 禁止目錄索引 Options -Indexes
  • 允許 .htaccess 複寫 AllowOverride All
<Directory /var/www/>
 Options -Indexes +FollowSymLinks
 AllowOverride All
 Require all granted
</Directory>

如果是 Ubuntu 14.04+ 的 Apache2 伺服器,可以在 /etc/apache2/apache2.conf 修改

限制 IP 網段存取指定 URI

  • URI 路徑 /
  • 禁止所有來源存取 Require all denied
  • 允許特定 IP 或網段存取 Require ip 192.168.100.0/24 192.168.101.0/25
<location "/">
 Require all denied
 Require ip 192.168.100.0/24 192.168.101.0/25
</location>

自動 http to https

  • 需要啟用 mod_rewrite
RewriteEngine on
RewriteRule ^(.*)$ https://%{HTTP_HOST}$1 [R=301,L]


參考

WordPress 建置筆記

  • 替換佈景主題時,不同的佈景主題,不一定都有提供 layout 細節的調整,有時候得從 CSS 下手。
  • 有插件實作安全機制
  • 有插件實作備份機制
  • 有插件實作 URL 後綴 .html SEO 優化

指定任意頁面為首頁

取代預設首頁呈現 articles 的樣式

https://www.yogoeasy.com/page-as-wp-frontpage/

WordPress 安裝在獨立目錄下

https://codex.wordpress.org/Giving_WordPress_Its_Own_Directory